Configuring Multi-Tenancy
Get the latest docs
You are looking at documentation for an older release. Not what you want? Go to the current release documentation.Multi-tenancy is a function that enables you to create multiple independent logical groups as isolated environments, which can be managed by a single Cloudify Manager. A tenant is a logical entity that contains all its resources, for example, blueprint, deployment, workflows and so on. Using multi-tenancy is useful when you want to limit access to a specific set of data (the tenant) to a defined set of users.
You can create tenants and perform a variety of actions on them, such as adding users and user groups, setting passwords, assigning roles, and more. If you integrate LDAP or your AD into Cloudify Manager, you use the users and user groups defined there for access to the manager. You must have Cloudify Manager administrator permissions to perform user-management related actions.
Multi-tenancy is implemented when you install Cloudify Manager.
Note
For Cloudify Community Edition users, a single tenant with a single user is created during installation. When you log into Cloudify Manager, the built-in credentials are used.
Multi-Tenancy for Premium Users
There are two options for using the multi-tenancy function in Cloudify Manager, as a standalone function that is not connected to an existing user managment system (LDAP/AD) or as a function that is integrated with the LDAP/AD user definitions. You must select one option only. If you already have LDAP/AD running in your organization, you probably want to use that, to streamline the process. If you do not use the LDAP/AD option, you must define each user individually.
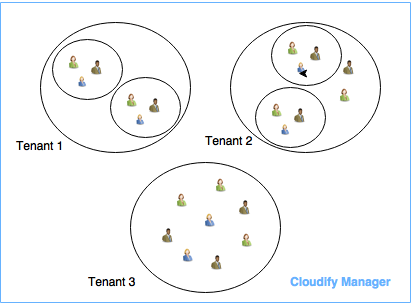
In the following diagram note that there are three tenants in Cloudify Manager. Tenants can be assigned groups of users, individual users, or a combination of both groups and individuals.
Basic Process for Adding Tenants, User Groups and Individual Users
This section describes a basic process for adding a tenant, then adding one or more users to it. It is relevant only to Premium users. Click here for information about managing users and here for information about managing user groups.
Tenants, users and groups can only be managed by users with an admin role.
Commands are executed in the context of a tenant, however it is possible to execute commands on a tenant other than the one you are currently logged into (by specfiying the tenant on which the command is to be executed.) You must have permissions to access that tenant.
- Logically, you start with a tenant. When you install Cloudify, a default tenant, named
default-tenant, is also installed. Either use the default tenant or create one or more new tenants.
Use the tenant-related commands that are listed later in this topic to create a new tenant. - Each Cloudify Manager has a default
super-adminuser that cannot be deleted. This user is the defaultadminfor all tenants in the Cloudify Manager instance. You can add other users to the tenant.
Use the user-related commands that are listed later in this topic to add a new user or user group. You can add users individually or as part of a group. You can add them manually, or via your organization’s LDAP/AD setup.
- To add a user or user group via LDAP/AD, connect to the LDAP/AD service.
- To add a single user or user group manually, specify the name of the user or group as part of the command.
- Specify a password and role for users that you add manually.
Users who are added from LDAP/AD retain their LDAP/AD password. You might still want to assign them a role.
Implement Multi-tenancy Process
Use this process to create tenants and add existing users and user groups. Additional information about these steps is provided after the procedure.
- Using
admincredentials in the Cloudify CLI (cfy), runtenants create [_tenant name_]to create a tenant. - Add resources such as blueprints, deployments, and so on, to the tenant.
You must specify the tenant when you are uploading, or set the profile to work with a specific tenant. - Run
tenants add-user [_user name_]and/ortenants add-user-group [_group name_]to assign one or more users to the tenant.
If you are connected to an LDAP/AD service, the names of user groups must match those defined in the service. - To remove a user or user group from a tenant, run
tenants remove-user [_user name_]ortenants remove-user-group [_group name_]as required.
Removing a user or group does not delete it, it just removes that instance of the user or group from the specific tenant. If a user is part of a group that remains on the tenant, they will not be removed from the tenant.
Managing Tenants
Tenants can be added or deleted by an admin user. Users and user groups can also be added. The users can then add or delete resources on that tenant.
When a user runs the list command on a tenant, they see all the tenants to which they are assigned - both through individual assignment and through membership of an assigned group.
Deleting Tenants
You must ensure that any tenant that you want to delete is empty, meaning that it does not contain any resources or users.
The default tenant that is created during the Cloudify Manager installation/bootstrapping cannot be deleted.
An admin user can execute commands on tenants other than the one which they are currently managing. Users with the user role can also manage resources on other tenants to which they have access while they are logged in to another tenant.
Integrating Multi-Tenancy with LDAP/AD
To connect Cloudify Manager with LDAP/AD, you must know the the URL of the service and have sufficient credentials to perform searches and so on.
You configure Cloudify with the LDAP configuration during the bootstrap process, in the manager-input section. You can also use the API to configure an LDAP connection after Cloudify Manager is installed, using the cfy ldap set command, as long as the manager is clean, meaning that no tenants, groups, users or resources exist in it.
Managing Users in the Multi-Tenancy Environment
There are a number of actions related to user access to tenants that an admin user can perform. For more information, see User Management